Apple App Store is the home to the second highest number of apps with a whopping count of more than two million apps available for download. Despite being second to Android apps in terms of strength, the popularity of iOS apps is enormous.
Many brands aspire to create apps for their iOS using customers. This was a challenge as traditional iOS app development is costly and time-taking.
However, AppMySite is changing the scenario with its advanced code-free DIY iOS app builder by making app building affordable, easy, and quick. Anyone can create premium iOS apps and submit them to the app stores without leaving the platform.
But just having a premium iOS app is not easy. As you create, launch, and promote your iOS app, you must follow the guidelines listed by Apple App Store.
As we know, user privacy and experience are of paramount importance to Apple. When dealing with iOS apps, you must be extra cautious about accessing and handling user data in the right manner.
Sounds overwhelming? Do not worry! We are here to help you with the same. Read the first blog in this series and learn about the best practices for accessing user permissions for iOS apps. Let us begin!
The importance of collecting user data through app permissions
Collecting user data in the right manner can help you ensure better prospects for your business and an enhanced experience for your users. It can give you more insights about your users’ behavior, preferences, demographics, etc., and help you make data backed decisions.
Getting access to user data by requesting permission from the users to access their device and other apps on the device, can help you collect crucial information and enhance the functionality of your own app.
This may include access to the photo album, media library, location, phone book, camera, microphone, etc. The permissions you need will totally depend upon your app type, features, functionalities, and goals. For instance, social networking and weather apps may ask for more permissions as compared to news apps and educational apps.
As per Wandera, most apps request five or less permissions and add three to four prompts. The permission list of iOS apps is much shorter than Android, and limits to personal information and a few other things.
This is so, because Apple treats app permissions in a different manner when compared with Google. For instance, unlike Android, accessing the internet and virtual assistant (Siri) does not fall under the permissions category for iOS.
However, it all boils down to the fact that adding prompts and requesting user permissions before getting access to the device features and other apps is extremely important. It can help you manage app permissions in compliance with Apple’s conduct and user privacy guidelines, avoid rejection on the app stores, cultivate customer trust and get access to critical user data ethically.
Suggested Read: Avoid getting rejected by Apple App Store: Find ways to make a comeback if you do
User permission requests: An introduction
Some apps often depend upon the users’ phone, peripheral devices, and other applications to serve their complete purpose and be fully functional. Some apps also request for access just to gather some data for making business and marketing related decisions.
Whatever the reason be, apps require user authorization to get access to the required data. This authorization is taken through user permission requests. It enables the app to access specific resources on the device and enhance the experience accordingly.
As listed above, the list of user permissions differs based on the OS (Operating System) type and iOS apps often have a shorter list of permissions that can be sought from the users through an app.
This may include an access request to the following:
- Personal data: This can include information related to personal data, location, health reports, financial reports, contact, etc.
- User-generated content: This may include data or content added by the users like emails, messages, calendar data, contacts, gameplay information, music activity, HomeKit data, audio files, video files, photos, and more.
- Protected resources: This includes access to resources like Bluetooth devices, home automation peripherals, Wi-Fi connections, and more.
- Device capabilities: This includes ability to leverage device features like camera, microphone, volume buttons, and more.
- Push notifications: The authorization may also extend to granting permissions for receiving push notifications. You can ask users to opt-in for notifications alongside the requests for other permissions.
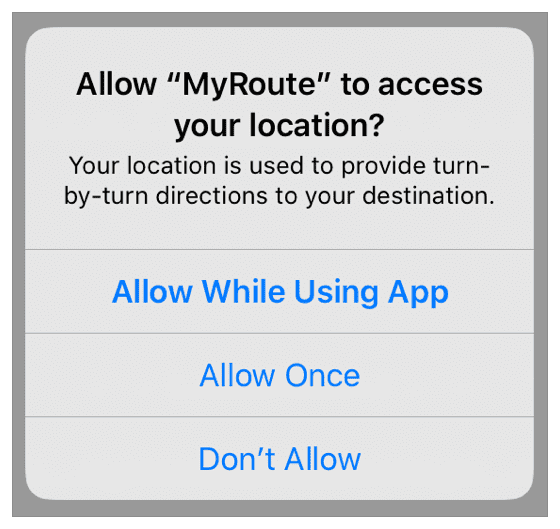
Structure of a user-permission prompt
The layout of a user-permission dialog box may vary from one iOS app to the other. However, the basic structure of the prompt remains more or less the same for every app.
In general, one or more prompts are displayed requesting the desired permissions when the users launch the app on their devices. Ideally, it contains a prompt displaying a message that sums up what and why the request is for.
In addition to the message, it contains action buttons for the user that may have different texts, depending upon your requirement and creativity. Users can click the buttons to either allow or deny the request based on their choice. Some apps offer a third option where the permission or access is granted only for the period that the app is in use.
Suggested Read: All you need to know about mobile app Push Notifications – A complete guide
How user permissions function in the iOS universe
Requesting user permission may sound really simple but it involves an intensive process. In this section we will help you decode the process of requesting access or user permissions in the iOS universe.
User permissions are sought at the launch of the app The first time an app attempts to access a protected resource, the prompt for user permission is generated by the system. For instance, if an app needs permission to access the user’s location, a prompt displaying the request appears on the user’s screen.
If the permission is granted by the user, the information is stored by the system and the request is not prompted again. However, if the request is denied, the attempt will fail. Else, if the user allows usage for “once” that permission only for that instance will be granted. One can also use a “Not Now” button to avoid denial altogether, and request for the same permission later in the future.
Purpose String
Purpose string or usage description is a message that tells users why the permission is being requested and how it is going to benefit them. The purpose description will vary based on the request and access type. It must appropriately and briefly tell the user that the app needs access to sensitive data and also give the reason behind it.
For example, if it is a dating app and it needs access to the user’s location, the message can be something along the lines of “Your location is needed to show the connections around you.” The idea is to keep the message short, simple, and straightforward.
If your app needs access to a protected resource, then purpose string must be provided. Else, the app’s access attempts will fail, and it may also lead to app crash.
Remember, the app review team checks if the submitted app uses protected resources. It rejects apps that contain code accessing those resources without a purpose string. So, if your app has been rejected for this reason, you can resubmit it after adding the purpose string key.
It is for this reason that AppMySite’s online app creator provides its customers with the option to declare the required permissions when they create an app and generate the build for it. This makes it easier to build an app that remains in compliance with the App Store guidelines.
Best practices for requesting user permissions
Now that you know what user permission requests are and why are they important, let us move forward. In this section, we will share the best practices that you can follow as you request for user permissions.
Add requests only for permissions that you need and follow the practices listed below:
#1: Write a compelling copy
Your message and the choice of your words in the message can have a great effect on the response you get from your users. Make a polite request and convey your goals and motives clearly.
For instance, “XYZ (name of the app) needs your location to search for nearby service centers” can be a good example of a crisp and clear message. Let us also understand it with a more elaborate message like “This app needs access to your location to update you of the local weather. If you only allow access while using the app, the weather reports will be updated only after you open the app.”
On the other hand, unclear or vague messages like “This app needs access to location for better experience” or assertive messages like “Turn on your location”, can have a negative impact. Also avoid using tough and polysyllabic words or passive voice sentences.
#2: Have a user-centric approach
Put yourself in your user’s shoes and then draft the messages. Instead of focusing on your leverage, assess how the access is going to benefit the user. Without patronizing, highlight this benefit in your content copy.
Additionally, you can also opt for user-triggered permission requests. Here, a permission request is not triggered at the launch of the app. In fact, it is not triggered until the user tries to access an app feature that is related to the request. There is a higher chance that you will get the access if you move ahead with this approach.
#3: Use a pre-permission dialog
If you feel that a purpose string does not do complete justice to your request, you can also add a pre-permission dialog box. Here, instead of seeing the permission prompt directly, users first come across screens or dialog boxes that highlight the importance and benefits of giving the permission to the users.
This “prepares” the user for the request, so they do not deny the request on the fly, but get time to think of it. This approach can also amplify the rate of success. However, remember that you do not need to add the “Allow/Deny” action buttons here. Use generic buttons like “Next; Ok, take me there; Ok, I understand” etc., and take the permission when they actually reach the prompt.
#4: Avoid stealth play
You can add pre-permission dialogs to highlight your purpose elaborately, but do not try to play stealth with your users or Apple. Always keep your contents aligned with the guidelines of App Store and respect your user’s privacy.
Apple clearly states that, “a custom messaging screen that takes advantage of such behaviors to influence choices will lead to rejection by App Store Review.” Here, such behaviors may also refer to users’ tendencies of tapping quickly to dismiss alerts without reading them. Also, do not try to incentivize users for granting permissions, or hide requests beneath smokescreens.
#5: Respect your user’s privacy
Users can change their permission settings any time while the app is on their system. So, you can always aim to alter their decision and prompt a request later even if they denied it at first. Do not be a buzzkill by prompting unnecessary permission requests. Design your app in such a manner that it intuitively makes the user’s journey smooth and effortless.
Do not abuse any permission that you receive from your users. Besides declaring the requests on your app clearly, also comply with the overall guidelines of the app stores and handle the information and data sensitively and responsibly.
Suggested Read: Nutrition labels on App Store – How is Apple’s privacy policy changing?
Need a makeover for your iOS app?
Tired of your old iOS app? Why not build a new app in the budget of a makeover? In fact, you can create, customize, and test your app for free and only pay to publish your app on the app store!
You can subscribe to AppMySite and turn WordPress website to mobile app without writing a single line of code. Here, you can build apps for your eCommerce stores, blog websites or CMS sites and generate builds for Android and iOS.
Unlike other DIY app builder, AppMySite enables you to build premium native apps and offer a feature rich experience to your users. It has an intuitive environment where you can easily manage the contents and settings of the app.
Here, you can also declare the permissions you want from your iOS users, and easily manage the requests. Additionally, you can connect your app store account and auto-deploy the apps with the on-site submission feature.
Create, customize, and preview your iOS app and push it to the Apple App Store with AppMySite. Enter the mobile app industry and make the most of the opportunities coming your way.
Also, stay tuned to this space and wait for the second part of this blog where we will share the best practices for accessing and handling user permissions for Android apps.
Configure user permissions as you create your app with AppMySite and generate iOS build. Visit our help centre and get all the guidance you need to accomplish this step with ease.