BackProducts
BackResources
How to create an app

How to create a mobile app

Updated January 2, 2025

How to create an app

This guide will help beginners understand how to build a mobile app from scratch for Android, iOS, and PWA.

Creating an app is your gateway to reaching millions on mobile. Whether you aim to build a mobile app for your business, launch a new startup, or bring a personal project to the world, this guide is designed for you.

Why every business needs a mobile app

custom-icon.webp

Boost
engagement

Studies suggest that mobile users spend 90% of their device time on apps and only 10% on browsers.

custom-icon.webp

Maximize brand visibility

Mobile apps enhance brand credibility and enable you to engage with users who prefer mobile apps.

custom-icon.webp

Deliver seamless functionality

Mobile apps offer effortless navigation for quick access to features compared to browsers.

custom-icon.webp

Improve customer retention

Native app features such as push notifications make it easier to retain customers and boost loyalty.

From first-time builders and non-technical users to entrepreneurs expanding their digital presence, we’ll walk you through every step of the app-building process — in a way that’s easy for everyone to understand.

Whether you're targeting Android, iOS, or a Progressive Web App (PWA), we’ll help you get started with a strong idea, a clear plan, and the right set of tools.

guide-back-up guide-back-up

How to make a mobile app in 8 steps

If you are wondering how to start creating a mobile app for the first time, this beginner-friendly guide will help you through the process of building an Android, iOS, or PWA app - no coding needed.

1

Define your mobile app idea & validate it with market research

2

Plan & prioritise key features of your mobile app

3

Choose between native mobile apps and PWAs

4

Choose your development platform

5

Make an app with a no-code mobile app builder

6

Test your mobile app before launch

7

Publish and share your mobile app

8

Maintain and update your mobile app

01.

Define your mobile app idea & validate it with market research

Every successful mobile app starts with a clear, well-defined idea. Before you think about design or development, you need to understand what problem your app will solve and who it’s solving it for.

Ask yourself

section-icon

What is the core problem or pain point my app will address?

section-icon

Who are the ideal users that need this solution the most?

section-icon

What will be the outcome — engagement, revenue, retention?

Once you have answers, set measurable goals around them. Define a North Star Metric — the one key outcome that matters most — and tie it to a realistic timeline. This will keep your efforts focused and help you avoid feature creep or building things that don’t deliver real value.

At this stage, it's also important to validate your app idea. Talk to potential users, explore forums or communities where your target audience hangs out, and check existing apps that solve similar problems. Tools like Google Trends, App Store search suggestions, or even surveys can help you understand if there's genuine demand.

The mobile app market is highly competitive. As of August 2024, the number of apps on the Google Play Store was 2.3 million, and 2 million on the Apple App Store. Only apps with clear value propositions and a unique problem-solving angle stand out in such a crowded space.

Let’s understand how you need to define your app idea and conduct necessary market research, step-by-step.

image
image
What problem does your mobile app solve?

The first step of creating an app is defining exactly what problem it solves. This ensures you clarify the unique value proposition (USP) of your app.

Take Zillow, for example - it makes real estate discovery easier. Uber makes ride-hailing fast and convenient.

section-icon

What gap does my app address in the market?

section-icon

Why would someone use my app instead of another? 

section-icon

How will it touch the pain points of the users?

Who is your target audience?

You know the problem your app solves, great. Now, define who experienced it

section-icon

Are these business owners or everyday consumers? 

section-icon

Is the problem specific to a region or country? 

section-icon

Is this an everyday problem or a rare one?

The answer to these questions will help you identify your target audience and create app user personas.

What are your competitors doing — and missing?
section-icon

What features do they offer?

section-icon

Where do they fall short?

section-icon

What do users like or complain about?

List down areas where you can improve or differentiate. Then, analyse how your competitors market their app. Since you share the same target audience, this will help you refine your go-to-market plan and understand your target ideal customer profile (ICP).

Validate your mobile app idea

Validate your app idea through market research.Before building your app, it's essential to confirm there's real market demand for your idea. This is where app market research comes in.

Two approaches to market research
section-icon
Primary research: Firsthand insights

This includes direct methods like surveys, interviews, and focus groups to gather feedback from your potential users.

section-icon
Secondary research: Market trends & data

This involves studying existing industry reports, competitor case studies, and user behavior trends from reliable sources.

section-icon Pro tip: Use reliable tools to validate your mobile app idea

Use tools like Google Play, App Store search suggestions, SimilarWeb, or even Reddit and Quora to research your market and validate your app idea with real user feedback.

If you're a first-time builder, conducting full-scale primary research might not be feasible. In that case, lean on secondary research to validate your app idea.

Look for existing data and trends in your industry. Explore reports, forums, reviews, and app stores to connect real-world user pain points with the problem your app aims to solve.

You can also analyze competitor reviews to find what users are asking for — and where those apps are falling short.

Summary — here’s how to define and validate your idea

  • Identify the core problem your app solves. 
  • Define your target audience and create user personas.
  • Study your competitors to identify gaps and expected benchmarks.
  • Validate your app idea through primary and secondary market research.

02.

Plan & prioritise key features of your mobile app

Once your app idea is validated, the next step is planning and prioritising its features. Many first-time app builders start with a long wishlist of features they might want to see in their apps. More often than not, this approach leads to complexity, delays, and higher development costs.

A more viable and sustainable way is to have a feature roadmap that supports the Minimum Viable Product. An MVP, or Minimum Viable Product, is the most basic version of your app that includes only the essential features needed to solve the main problem for your users.

It’s not the final version — it’s a starting point designed to help you launch faster, test your app with real users, and gather feedback early on.

Ask yourself

section-icon

What are the core features you need to launch your app successfully?

section-icon

What supporting features do you need to optimize the user experience?

image

Which features will truly set your app apart from others in the market?

The first step in your feature roadmap is to list the essential features — the ones your app can't launch without.

image
image
List core features

Before adding extras or "nice-to-have" ideas, focus on identifying the core features — the ones your app absolutely needs to solve the primary problem and deliver value.

What to include in core features
section-icon

Solves the app’s primary purpose

section-icon

Powers a complete, usable experience

section-icon

Necessary for the app to function

Avoid listing features that you hope to build someday. As a beginner, it’s best to start lean. Your goal at this stage is to create a version of the app that does just enough — nothing more, nothing less — to validate your idea and start gathering feedback.

List supporting features

Once your core features are defined, the next step is to list the supporting features — the ones that may not be essential to launch, but will help enhance the user experience, drive engagement, and add polish to your app.

These features should still be included in your feature roadmap, even if you plan to introduce them in later updates.

For example:

In a cab booking app, the core features might include location tracking, booking, and payment. A tipping option, however, isn’t essential for the app to function — but it adds value for both drivers and riders, and improves user satisfaction.

Popular supporting features include:
section-icon

Push notifications

section-icon

Reviews & ratings

section-icon

Social sharing

section-icon

Wishlist & bookmark

section-icon

User profiles

section-icon

Search & filters

Over time, as you gather user feedback and observe usage patterns, this list will naturally grow. In the beginning, keep it focussed and realistic. Prioritize features that meaningfully enhance the experience without slowing down your launch.

section-iconPro tip: Launch with what matters most

Your app doesn’t need to be perfect on day one. Focus on the core features that highlight your app’s unique purpose and solve the core problem for your users. Even without every supporting feature in place, a strong MVP is enough to launch, gather feedback, and start growing.

03.

Choose between native mobile apps and PWAs

When people think of building an app, they often imagine something listed on the App Store or Google Play. But those are just one category of apps — known as native apps.

In reality, there are multiple types of mobile apps, and choosing the right one depends on your goals, budget, and timeline. One increasingly popular alternative is the Progressive Web App (PWA) — especially for beginners looking to launch quickly and collect early user feedback.

Before diving into the differences, let’s start with native apps.

Compare native mobile apps and PWAs
What are native mobile apps?

In simple words, native apps are designed to run directly on specific devices, like Android & iOS. These are apps you download from the Google Play Store or the Apple App Store.

To better understand native apps, compare them to mobile websites.

A mobile website runs on a browser. A native app runs directly on your device, launching from its icon and interacting with your phone’s hardware and operating system.

Key benefits of native mobile apps
High performance icon
High performance

Built with platform-specific languages like Kotlin, Java, or Swift, native apps offer faster load times and smoother performance.

Deeper device integration icon
Deeper device integration

Easily tap into device features like the camera, GPS, notifications, and offline storage.

Better user experience icon
Better user experience

Native apps follow iOS and Android design guidelines, making them feel seamless and intuitive.

App store visibility icon
App store visibility

Listing on app stores boosts your app’s discoverability and builds user trust.

What are Progressive Web Apps (PWAs)?

Progressive Web Apps (PWAs) are a type of app built using web technologies, but they look and feel like native mobile apps.

They can be installed on a device, placed on the home screen, and even work offline — all without needing to go through the App Store or Google Play.

While PWAs are technically built like regular websites (using HTML, CSS, and JavaScript), they include additional technologies that allow them to deliver an app-like experience, such as:

  • Service worker: A background script that can unlock advanced features like offline access, push notification, caching, etc.
  • Web app manifest: A file that contains information like app icon, app name, splash screen, etc. This enables PWAs to be installed on mobile devices.
Key Benefits of PWA
Easy access and installability icon
Easy access and installability

Thanks to the web app manifest, users can install a PWA directly from their browser — no need to visit an app store.

Fast and lightweight icon
Fast and lightweight

PWAs load quickly because they're built with streamlined web code and can cache assets using service workers.

Offline support and background sync icon
Offline support and background sync

With service workers, PWAs can cache data, allowing users to access content even without an internet connection.

Push notifications icon
Push notifications

Like native apps, PWAs can send real-time updates using service worker scripts, helping boost user engagement.

Native mobile app vs PWA: Which one should you build?
Short answer: build both, if you can.

Native mobile apps offer better performance and deeper device integration, and a polished user experience. PWAs are faster to launch, easier to share, and more cost-effective, especially when you're just starting out.

If you’re on a limited budget or want to validate your app idea quickly, starting with a PWA is a smart move. It lets you launch fast, gather user feedback, and improve over time, without app store barriers.

If you’ve already validated your idea, have the budget, and are aiming for scale, a native app will serve you better in the long run, offering smoother performance and access to device-level capabilities.

The good news? You don’t have to choose just one.

With AppMySite, you can build and publish native apps and PWAs from a single platform — without writing code. That way, you can offer users the flexibility of installing your app from the App Store or accessing it instantly via a browser.

04.

Choose your development platform

So far, you’ve defined your app idea, validated it, and outlined the key features — in short, you’re ready to start building.

Now comes the big question: how will you create your mobile app?

Choosing the right development platform depends on your goals, technical skills, budget, and how quickly you want to launch.

In the next sections, we’ll walk you through two common app development options — one for beginners and one for full custom control.

Compare no-code app builders and coding from scratch
Option 1: Use a no-code mobile app builder

If you're a beginner, small business owner, or just someone who wants to launch an app quickly, using a no-code app builder is often the smartest choice. These platforms allow you to build and publish mobile apps without any technical skills.

Instead of hiring a developer or learning to code, you can simply sign up for an app builder solution, choose your features, customize your design, and generate native apps and PWAs — all in one place.

AppMySite, for example, lets you create native Android, iOS, and PWA apps — all without writing a single line of code.

Benefits of using a no-code mobile app builder
Ease of use icon
Ease of use

No-code builders make app creation simple for anyone — no tech skills needed.

Faster time to market icon
Faster time to market

Build and launch your app in hours or days, not months.

No developers required icon
No developers required

Skip the agency hunt and technical hiring process.

Cross-platform compatibility icon
Cross-platform compatibility

Many no-code tools support Android, iOS, and PWA from a single dashboard.

Easy maintenance icon
Easy maintenance

Make changes without needing ongoing developer support.

Lower development costs icon
Lower development costs

Ideal for MVPs or budget-conscious launches.

Option 2: Code your mobile app from scratch

In case you have the technical experience required to code your app from scratch, or your app idea requires complex features not supported by no-code solutions, you can consider a custom app development approach.

This method gives you control over the design and features of your app, but also requires more time, technical knowledge, and budget.

Benefits of custom mobile app development
Unlimited customization icon
Unlimited customization

You can build any feature, screen, or interaction exactly the way you envision it.

Control over performance icon
Control over performance

You choose the tech stack, optimize how the app runs, and manage all aspects of backend/frontend development.

Access to device features icon
Access to device features

Native development allows direct integration with hardware (e.g., AR, Bluetooth, background processing, sensors).

Custom mobile app development challenges
Higher cost icon
Higher cost

You'll need to hire iOS and Android developers or a full-stack development team if you're not building it yourself.

Longer development cycle icon
Longer development cycle

Building from scratch can take months — from design and development to test and launch.

Different codebases needed icon
Different codebases needed

iOS and Android require different codebases unless you use a hybrid framework like Flutter or React Native.

App development Gantt chart

Pro tip iconPro tip: Freelancers vs no-code: What to choose

Another option is to hire a freelance developer or an agency to build your app. This approach also gives you flexibility and customization, but it’s also the most expensive and time-consuming. If you're just starting or working on an MVP, using a no-code app builder is usually faster and more cost-effective.

Option 3: Vibe code your mobile app with AI-tools

Not all approaches to mobile app development fit into ‘no-code’ and ‘full-code’ molds. Vibe coding is somewhere in the middle.

Vibe coding is an approach to development which involves heavy use of AI to generate code based on user prompts. Imagine you’d like to build a mobile app, but don’t know where to start. You can explain your requirements to AI-LLMs like ChatGPT and Claude and generate code. Products like Replit and Lovable are built around this concept.

However, vibe coding still requires you to understand the basics of development — things like APIs, data structures, and logic — so you can refine, debug, and extend the AI-generated output.

Benefits of vibe coding with AI-tools

Here are some advantages of building a mobile app with vibe coding:

Faster than traditional coding icon
Faster than traditional coding

AI speeds up boilerplate tasks and common coding patterns.

Customizable icon
Customizable

Unlike strict no-code builders, you can generate unique features tailored to your app idea.

Learning-friendly icon
Learning-friendly

Great for beginners who want to “learn by doing” while leaning on AI for heavy lifting.

Vibe coding vs no-code – How are they different, and which is better?

With vibe coding, you’re dealing with raw code generated by LLMs based on prompts you have written. In short, you’re still dealing with code, even if you don’t have to write it.

No-code solutions are different – you’re not required to write or generate any code at all. With a mobile app creator like AppMySite for example, you can use native features to build an app from scratch.

So which method of development is better? Here are some factors you should consider:

Technical skills needed icon
Technical skills needed

No-code solutions do not require you to have any technical skills. Most features are simple drag-and-drop. Vibe coding requires you to have some basic knowledge of development, custom logic, and APIs.

Ease of use icon
Ease of use

No-code is extremely beginner-friendly and requires no prior experience. With vibe coding, there is a learning curve because you must know how to guide AI tools effectively and refine the code they produce.

Reliability icon
Reliability

No-code platforms are stable and tested, so you can expect your app to work as intended right out of the box. Vibe coding can sometimes produce buggy or inconsistent code, and you’ll need to review and debug AI outputs.

Speed to launch icon
Speed to launch

No-code is the fastest way to launch since modules are prebuilt and ready to publish. Vibe coding can also be fast, but the speed depends on your ability to write good prompts and test the generated code.

Flexibility icon
Flexibility

No-code platforms are limited to the features they provide, which may restrict customization. Vibe coding gives you more flexibility to build unique features, integrate APIs, and go beyond platform limitations.

Which one is right for you?
Choose no-code icon

Choose no-code if you want the simplest, fastest, and most reliable way to launch an app without technical complexity.

Choose vibe coding icon

Choose vibe coding if you’re comfortable experimenting with code, enjoy working with AI tools, and want more flexibility to build something unique.

05.

Make an app with a no-code mobile app builder

By now, you’ve laid the groundwork for your app - from validating your app idea to outlining the core and supporting features. If you’ve decided to use a no-code platform, you’re on the fast track to creating your app.

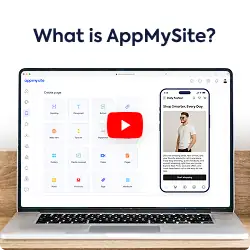
Among the many no-code solutions available, AppMySite stands out for its user-friendliness, speed, and the ability to create both native apps and PWAs — without writing a single line of code.

With AppMySite, you can launch feature-rich mobile apps for Android, iOS, or the web. Whether you’re building a shopping app, blog, business tool, or community space, the platform offers everything from real-time app previews to advanced features like chat, analytics, push notifications, and more.

So, what does the mobile app development process look like with a no-code builder like AppMySite?

App builder walkthrough
Design your mobile app’s visual elements

The design of your app plays a vital role in how users perceive and interact with it — and with AppMySite, you have complete control over the look and feel of your app, right from the start.

Begin by creating your app icon and splash screen — the first visuals users see when they install and launch your app. You can upload your designs or use AppMySite’s built-in design editor to create them from scratch.

Next, choose your global color theme to match your brand. You can customize elements like the app header, buttons, and overall layout styling. Set the stage for seamless user journeys by configuring

Branded home screen design icon

A branded home screen design

Side menu and bottom navigation icon

Side menu and bottom navigation

Granular styling icon

Granular styling for every element

Every visual element you add — from screens to content blocks — can be easily styled to ensure your app feels polished and fluid. And the best part? You can make design changes anytime, even after publishing.

With AppMySite, you’re not locked into rigid templates. You’re free to curate a seamless user experience that reflects your brand and engages your audience from the very first tap.

Add content to your mobile app

Your app’s content isn’t just about words — it’s everything your users will see, browse, tap, or engage with.

With AppMySite, you can populate your app with a wide variety of visually rich content, whether you’re importing it from an existing website or creating it directly within the platform.

Manage your mobile app content with AppMySite:
section-icon

Create and publish new pages and posts with multimedia blocks

section-icon

Design screens with videos, images, links, & embedded media.

image

Sync website content to your app

Whether you're showcasing a product, writing a blog, or creating an interactive landing page — content is fully customizable.

Personalize everything
section-icon

Layout, font & theme colors

section-icon

Date stamps, author & thumbnails

section-icon

Tags and category filters based on attributes

Everything you publish is automatically synced and reflected live in your app, minimizing ongoing maintenance.

And of course, your home screen — the face of your app — can be customized to highlight key content areas. You’re in control of how users engage from the very first screen.

Set up navigation

Your mobile app’s navigation is the foundation of a great user experience. With AppMySite, you can customize how users move through your app using two key navigation elements: the bottom bar and the side (hamburger) menu.

The bottom bar is your app’s main navigation tool, always visible at the bottom of the screen. Add your most important screens here — like Home, Shop, Blog, or Profile — so users can reach them instantly.

Common options for bottom navigation
section-icon

Pages & posts

section-icon

Categories & tags

section-icon

External web links

Common options for side menu
section-icon

Settings, logout, contact options

section-icon

Call, email, share links

section-icon

Social media menu

Enhance your menu styling with these features
section-icon

Add items with custom icons, labels, and links

section-icon

Choose grid or list view and tile shape

section-icon

Set colors, text, and icon visibility

Together, your navigation setup ensures users can move fluidly through your app, with quick access to everything that matters.

Create a smooth onboarding experience

Your app’s onboarding flow is the first real interaction users have, and it sets the tone for what follows. With AppMySite, you can enable login and signup options that make onboarding simple and secure.

Multiple onboarding options include
section-icon

Email login and signup

section-icon

Google and Apple login

section-icon

OTP login

You can also personalize your onboarding flow to reflect your brand. From colors and fonts to logos and backgrounds, every screen — including login, signup, and consent — can be styled to create a seamless and trustworthy first impression.

Add premium native mobile app features

Now that your app looks and feels complete, it’s time to enhance it with the right features. AppMySite allows you to easily configure a wide range of tools that improve user experience, engagement, and monetization.

Supercharge your mobile app with these features :
section-icon
Analytics

Track how users interact with your app, including screen views, installs, and engagement patterns. Activating analytics gives you insight to improve your content and navigation over time.

section-icon
Live chat

Enable in-app chat to offer real-time support or communication. You can link tools like Zendesk, Intercom, and other chat services to create a direct line to your users.

section-icon
Push notifications

Send rich push notifications to re-engage users, highlight offers, or share important updates. You can personalize messaging and schedule notifications with ease.

section-icon
Advanced webview

AppMySite’s advanced webview settings help ensure seamless performance. You can control navigation, restrict external redirects, & enhance how website pages behave in the app.

section-icon
In-app purchases

If you're selling digital products or gated content, integrate in-app purchases to monetize your app directly through the App Store or Google Play.

section-icon
In-app ads

Integrate with major ad networks like Google AdMob so you can display banners, interstitials, or rewarded ads.

These steps allow you to build a mobile app on AppMySite. Once you configure your app to your liking, you can test your app in real time and download it from your account and be ready for submission or distribution.

06.

Test your mobile app before launch

Now that you’ve assembled all the pieces — from validating your idea and outlining features to designing and building your app — it’s time to take one final, crucial step: test your app before going live.

Whether you're launching on Android, iOS, or as a PWA, it's important to test how your app performs across all platforms. This helps catch bugs, improve usability, and ensure everything works as expected.

If possible, share your app with a few beta testers — friends, colleagues, or even professional QA testers — to gather feedback from real users before launch.

What to check before your mobile app goes live?

Here’s a quick checklist to help guide your app testing

section-icon
Speed and performance

Ensure your app loads quickly and runs smoothly.

section-icon
Crashes and glitches

Monitor your app for stability during different actions and flows.

section-icon
Navigation flow

Ensure smooth flow between different screens of your app.

section-icon
Feature functionality

Check if your app’s features work as expected.

section-icon
Brand alignment

Check if the app matches your brand’s color scheme.

section-icon
Accessibility check

Verify that no features or screens in your app are broken or hidden.

image
image
Testing on mobile devices

Once your app is ready, it’s important to see how it looks and performs on real mobile devices - both Android and iOS. 

To test on Android devices, the easiest way is to install the APK file directly on your phone. You can also share the file with friends, family, and colleagues to collect feedback. It’s a simple, hands-on way to experience your app exactly as users will and spot any final tweaks if needed. 

For iOS, you can use Apple TestFlight, a tool that lets you test your app on iPhones and iPads before submitting it to the App Store. You’ll receive a test build that can be shared with internal or external testers.

Effortlessly test your mobile app with AppMySite
section-icon

Download your APK for Android testing

section-icon

Test iOS build with the Apple TestFlight feature

section-icon

Preview your app live on Android & iOS simulators

Testing across both platforms ensures your app feels smooth, polished, and fully functional, no matter the device.

07.

Publish and share your mobile app

You’ve built, customized, and tested your mobile app — now it’s time to publish it. The distribution process depends on the platform:

section-icon

For Android, apps are published on the Google Play Store

section-icon

For iOS, the only official channel is the Apple App Store

section-icon

PWAs can be shared instantly via a URL

Let’s walk through how publishing works on each platform.

image
image
Publishing on the Google Play Store

To get started, you’ll need a Google Play Console account, which involves a one-time $25 fee. New accounts may also be asked for ID verification before proceeding with app submissions.

Set up your mobile app listing

Once your Google Play Console account is active, the next step is to set up your app listing — the information that users will see on your app’s Play Store page.

Metadata required for Google Play submission
section-icon

App name and icon

section-icon

Screenshots that show the app interface

section-icon

Feature image (banner)

section-icon

Video demo (optional)

section-icon

Short description (visible in search results)

section-icon

Long description (a detailed summary of your app’s features)

This content forms your store listing, which plays a key role in how users discover and engage with your app. Make sure it’s clear, well-written, and reflective of what your app offers.

Additional information required for Android app review
section-icon

Select a category for your app

section-icon

Add a privacy policy URL

section-icon

Fill content rating questionnaire

section-icon

Disclose your app’s target audience

These fields help ensure your app complies with Play Store policies and provides transparency to your users. Filling them out accurately is a crucial part of publishing your app successfully.

For first-time publishers, Google mandates a closed testing period. This means you’ll upload your Android app’s AAB file and share access with a group of at least 12 testers. These users need to install and use your app for at least 14 days to validate its functionality and stability. It’s a one-time checkpoint to ensure quality before public release.

Once testing is complete, you can request production access. After approval, you’ll create a release and submit your app for review. Once approved by Google, your app will go live on the Play Store and be available for download.

Publish on the Apple App Store

To publish your app on the Apple App Store, you'll first need to enroll in the Apple Developer Program. This requires an Apple ID and an annual fee of $99. Once your account is active, you'll be able to access App Store Connect, the platform where all app submissions are managed.

Metadata required for Apple App Store submission
section-icon

App name

section-icon

Description of app features

section-icon

Support URL and privacy policy

section-icon

Screenshots for iPhone and iPad

section-icon

Category selection

section-icon

Keywords for search optimization

Since Apple conducts a manual review of every app submission, it’s important to provide accurate and detailed information. Reviewers will test your app based on the metadata and assets you submit, so clarity and completeness are key.

Once your listing is ready, you’ll upload your app build using Transporter, a free macOS app provided by Apple. This tool allows you to submit your app binary to App Store Connect.

After submission, Apple reviews your app to ensure it meets App Store guidelines. If everything checks out, you’ll receive an email confirming that your app is live and ready for download.

section-iconPro tip: Mac device requirement for App Store submission

If you don’t have one, you can use a Mac Cloud service — or if you're using an app builder like AppMySite, you can complete the submission process without a Mac.

Share progressive web apps (PWAs) via link

PWAs don’t require submission to an app store. Once your PWA is ready, you can share it instantly via a direct link through your website, email, social media, or any other marketing channel.

When users open the link on their mobile browser, they’ll typically see a prompt to add the app to their home screen, allowing them to access it like any other mobile app — without needing to download it from a store.

With AppMySite, you can create and publish Android and iOS apps, as well as share your PWA instantly — all from a single platform.

08.

Maintain and update your mobile app

Launching your app is a significant milestone, but the journey doesn't end there. To ensure long-term success, focus on the following key areas

Monitor and analyze user engagement

Understanding how users interact with your app is crucial. Utilize analytics tools to track metrics such as

section-icon

Daily Active Users (DAU) and Monthly Active Users (MAU)

section-icon

Session duration and frequency of users

section-icon

User retention rates and churn rates

Regular analysis helps identify what's working and where improvements are needed, enabling data-driven decisions for future updates.

section-icon
section-icon
Maintain and update your mobile app regularly

Regular updates keep your app relevant and functional. Focus on

section-icon

Bug fixes and performance improvements

section-icon

Feature enhancements based on user feedback

section-icon

Compliance with the latest OS updates

Consistent updates not only improve user experience but also signal to app stores that your app is active, potentially boosting visibility.

Gather and implement user feedback

Encourage users to provide feedback through in-app prompts, surveys, or app store reviews. This feedback is invaluable for

section-icon

Understand user needs and preferences

section-icon

Prioritize feature enhancements

section-icon

Identify bugs or usability issues

Actively responding to feedback demonstrates commitment to user satisfaction and fosters a loyal user base.

Optimize app store presence

App Store Optimization (ASO) is essential for discoverability. Regularly update

section-icon

App descriptions and keywords to reflect new features

section-icon

Screenshots and videos showcasing the latest UI/UX

section-icon

Earn user reviews and ratings by encouraging satisfied users to leave feedback

A well-optimized app store listing can significantly increase organic downloads.

Engage users through marketing & promotions

Sustained marketing efforts are key to retaining existing users and attracting new ones. Strategies include

section-icon

Push notifications for updates, promotions, or personalized messages

section-icon

Email campaigns targeting user segments with tailored and personalized content

section-icon

Social media engagement to build a community around your app

Plan for scalability and growth

As your user base grows, ensure your app infrastructure can handle increased demand.

Consider this

section-icon

Performance testing to identify potential bottlenecks

section-icon

Backend optimization for faster load times and reliability

section-icon

Strategic partnerships or integrations that add value

Proactive planning ensures a seamless experience for users as your app scales.

section-icon Final thoughts

Creating an app is no longer limited to developers or large teams — with the right approach and tools, anyone can do it. This guide has walked you through every step, from idea to launch, and hopefully made the process feel more approachable.

With a no-code platform like AppMySite, not only can you build and publish your app with ease, but maintaining it post-launch is just as simple. Whether it’s updating content, tweaking design, or managing features, everything stays within your control — no code, no complexity.

Where you take your app from here is entirely up to you. But you’re well-equipped to get started — and to keep growing.

Beginner’s checklist for creating a mobile app

Use this checklist to answer key questions before you start the app development process

tick

1. What is the core idea of your mobile app?

Every app development journey starts with a clear purpose. Identify a key user problem and validate your idea with market research to ensure real demand.

tick

2. Which platforms do you want to distribute your mobile app on?

Take a call on whether you wish to publish a native mobile app or a PWA. Your choice should align with your budget and overall development process.

tick

3. Is there demand for your mobile app idea?

Look for existing data and trends in your industry. Explore reports, forums, reviews, and app stores to connect real-world user pain points with the problem your app aims to solve. This will enable you to understand if there’s a real demand for your app idea.

tick

4. What will the essential features be?

List the core features your app needs to fulfill its main purpose. This forms the foundation of your MVP and guides the early app development process.

tick

5. Which development platform will you choose?

You have two main options:

  • Build your app with a no-code mobile app builder
  • Code your app from scratch

No-code platforms help you build and launch apps for Android, iOS, and PWA quickly. If you choose custom development, it's best to work with developers or an app agency unless you're experienced with app development technologies.

tick

6. How will you design your mobile app?

Your app design process depends on your development approach. No-code platforms like AppMySite let you customize your app’s layout, colors, and theme without coding. If you’re working with developers, you can share wireframes or mockups to ensure the design reflects your brand.

tick

7. How will you test your mobile app?

Test your app by installing it on real devices — use the APK file for Android and TestFlight for iOS. Share it with friends or colleagues for feedback, and if possible, involve QA testers to ensure everything works smoothly across devices.

tick

8. How will you publish your mobile app?

To publish native apps, you would need to create a Google Play Console account and an App Store Connect account. Creating a Google Play Console account involves a $25 one-time fee, and a $99 annual fee for an App Store Connect account.

section-icon

Distribute PWAs

Distributing PWAs does not require any app store approvals. It can be distributed directly via links.

section-icon

Publish Android app

Read our documentation to learn how to publish your Android app on the Google Play Store.

section-icon

Publish iOS app

Read our documentation to learn how to publish your iOS app on the Apple App Store. 

Proactive planning ensures a seamless experience for users as your app scales.

tick

9. Do you have a post-launch marketing plan?

Promoting your app is just as important as building it. Start with App Store Optimization (ASO) by using relevant keywords in your listing. From there, build a marketing plan based on your target audience and key goals — whether that’s increasing downloads, user retention, or revenue.

tick

10. How do you plan to collect user feedback?

User feedback is key to improving your app over time. Use channels like in-app support, app store reviews, and direct outreach to understand what users love — and where they’re facing issues. Look for patterns to guide your next updates.

Get started with AppMySite

This guide above provides complete insight on how to create an app in 8 simple steps. From different methods of app development to the steps required post-development and launch, it covers all grounds. Use them to get directions and build successful apps.

Once you know how to create an app, you can build one for your business or even offer your services to other businesses. You can subscribe to AppMySite to build any type of app you want.

It doesn’t require you to study courses and learn coding to figure out how to create an app. You can simply sign up for AppMySite, choose a plan that suits you best, and start building apps for your business.

Get started with AppMySite Get started with AppMySite

Trusted by 800,000+ users worldwide

See what businesses are saying about AppMySite across leading review platforms and discover why teams around the world trust us to power their mobile apps.

See all reviewsArrow right
G2 star rating
Capterra star rating
Trustpilot star rating
WordPress star rating

Start building your mobile app today

Get started for free. No credit card required.

© 2026 All rights reserved - AppMySite

Facebook YouTube LinkedIn Instagram X Product Hunt