The online education & learning industry has grown tremendously over the years. Homebound online education especially became a compulsion in the times of COVID-19, and online education platforms have taken huge strides since then.
More individuals, academies, institutions, organizations, and businesses now understand the importance of going online by creating websites and apps to stay aligned and trending in the age of the internet and smartphones.
This is being made possible by online tools and software that are now available in abundance. For instance, LearnDash is one of the go-to platforms for creating and selling online courses and is also going to be our topic of interest and discussion today.
It is a cloud-based WordPress plugin and Learning Management System (LMS) that offers tools for turning WordPress sites into educational platforms, creating custom courses, and selling them online.
If you have a WordPress + LearnDash website, complementing it with an app has become extremely important for reaching mobile-friendly users. Today, we are here to help you with the same.
So, stay tuned with us and discover the easiest way to create an app for your LearnDash website. Make your end-to-end journey more informed and effortless with this step-wise guide and create an app for your educational platform.
Suggested Read: Know why creating apps is highly important for small scale businesses
In this blog
- Step 0: Set up an amazing LearnDash website
- Step 1: Sign up for AppMySite’s online app builder
- Step 2: Customize the app design and appearance
- Step 3: Connect your LearnDash website with the app
- Step 4: Design the app navigation and menus
- Step 5: Configure and manage app settings
- Step 6: Preview and test your LearnDash app
- Step 7: Generate app builds & submit the apps to the app stores
- Bonus Step: Integrate advanced features to step up your game
- What are the features that power the LearnDash app?
- How to create a standalone mobile app for your online courses?
- How can a mobile app benefit educators and learners?
- Frequently asked questions
How to turn your LearnDash site into Android & iOS mobile apps?
Now let us cut to the chase and learn how we can create a WordPress website with LearnDash and complement it with an app. Also, we are going to focus on the app-building part as that is what we excel at!
Step 0: Set up an amazing LearnDash website
Start by creating a WordPress website, if you do not already have one. Purchase a web hosting service and reserve a domain name. You can install the WordPress software yourself or get a reliable hosting service that includes this feature and offers a one-click WordPress installation.
Once everything is set up, go to your WordPress admin panel, and install the LearnDash Plugin. Next, install a theme that is compatible with LearnDash and configure it. Additionally, you can set the color scheme, typeface, etc., to manage the aesthetics of the website.
Next, proceed to create courses and get started with your WordPress + LearnDash website. Once your website is up and running, proceed to convert your WordPress site to an app (see the steps below for the easiest method) and offer a mobile-friendly experience to your users.
Suggested Read: How to set up your e-commerce business with WordPress & WooCommerce – Complete guide
Step 1: Sign up for AppMySite’s online app builder
Now let us get to the part that we are here for and dive into the process of creating an app for your website. We are sharing the easiest and most user-friendly way of creating premium feature-rich apps without hefty investments.
Custom LearnDash app development may soon become obsolete. You can ditch these traditional methods of app development that require you to invest in developers and technicians, or hire agencies, and yet wait for ages to get your app developed. Instead, take the smarter road and build your app with AppMySite’s no-code LearnDash app builder.
Why not create your own app without writing a single line of code and shape it the way you want to? All you need to do is sign up for the app builder and get started on your app-building journey immediately.
Subscribe to AppMySite’s free online app maker and enter a name for your app project. Select a suitable product and proceed to develop your app. We recommend you go with the WordPress App solution as it offers deep integration with WordPress and ensures smooth support for its native features.
Click on the ‘WordPress App’ button, enter your website’s URL, and hit ‘Create’ to launch your dashboard and start creating your app. Follow the steps discussed ahead and design your LearnDash app like a pro.
Step 2: Customize the app design and appearance
Start building your app and giving shape to it under the ‘Design’ section. Here, you can design your app’s icon and screens and customize the look and feel of your app.
Moreover, AppMySite also gives you the freedom to design all elements from scratch or upload your existing artwork. You can add images, format the text, and more. Play around with the advanced design tools and watch your app come to life.
The best thing about this app builder is that it lets you preview every change you make to the app, so that your journey is smooth, and the app turns out flawless. So, continue to track and monitor every change on the live emulator and perfect your app on the go.
Additionally, if your app needs a Consent Form for users to fill in you can configure the settings under the ‘Access’ section. Also, design and configure your login screen and manage how users get onboard.
Suggested Read: How does AppMySite simplify app design?
Step 3: Connect your LearnDash website with the app
Apps built on AppMySite with the WordPress solution can be directly powered by your website. This eliminates the need for manual app management and enables you to auto-populate most of your website data on the mobile app. This ensures more consistency between your website and app and less work.
Go to the ‘Connectivity’ section and start with installing the AppMySite plugin. Enter the details as per the prompts and grant AppMySite required access to facilitate the easy transfer of data from the website to the app and establish a connection between the two.
In case you face some trouble with connectivity, which can happen due to a variety of external factors, you can troubleshoot and find out the issues without leaving the site. All you have to do is run troubleshooting and work on areas that need attention.
As part of continued app maintenance, you can also monitor your app’s connectivity at regular intervals. Schedule a monitoring activity as desired and get notified of issues, if any. Iron out any kinks and always ensure robust website-app connectivity.
Step 4: Design the app navigation and menus
In this step, you can design the overall layout of your app and configure the ‘Navigation’ settings as well. Add a color theme and define the appearance of your header, buttons, and so on.
Ensure that it matches the overall theme of your LearnDash website. Let your users feel familiar while navigating the app and retain your brand’s look and feel. Design a home screen that allows them to get an overview of what you have to offer and access everything on the fly.
Add a side ‘Menu’ and ‘Bottom Bar’ and make important items easily available for your users. You can also import your website’s menu and ensure consistency across both your platforms. Use point-and-click options to set up the app menu and be done in no time.
Step 5: Configure and manage app settings
The next few steps are all about defining the features and fine-tuning the settings of your mobile app. For example, the ‘Webview’ section enables you to manage the web interface within your app.
Here, you can manage the appearance of your in-app browser and choose to show or hide sections that appear in the webview interface. Control how the web elements are placed within the app and manage their aesthetics.
Additionally, you can also configure the ‘Pages’, ‘Posts’, and ‘Products’, and their related settings within your app as follows:
- Pages: This is the section that lets you control the appearance of your website pages within your mobile app. For instance, this can be your ‘Home,’ ‘Contact,’ or ‘About’ page, or more. You can choose to render it as a webview or a native element of the app.
- Posts: In this section, you can manage the availability and appearance of posts in your app and finetune configurations related to the post list. A few toggle buttons are all it takes to determine how you want posts to appear on your app.
- Products: If you sell products on your app, you can manage all the related settings under this section. Add and customize the display of your commodities the way you want. Show product specifications and descriptions and manage checkout settings as well.
Additionally, there is also a dedicated ‘Settings’ section that enables you to manage the ‘General’ and ‘Social’ settings of the app. Here’s what it offers:
- General: This section requires you to enter the basic information related to your business that will get added to your app. Here, you can define your website’s category and append your Terms & Conditions page.
- Social: As the name suggests, this section enables you to integrate your social media handles into the app and show them to your users. Just add the URL of different social media pages and be ready to roll.
You can manage this thorough list of various kinds of settings, with a click of a few toggles only. This will give a final shape to your app and help you add and configure features that matter to you. Once done, click on save and proceed to Preview the app.
Suggested Read: Some handy tips to design the best bottom navigation bar menu on AppMySite
Step 6: Preview and test your LearnDash app
AppMySite’s dynamic ‘Preview’ feature is one of its highlights. Check how your app looks and performs in this section. The apps can be previewed on well-designed emulators that simulate Android and iOS device environments.
Here, choose the operating system and device type and start previewing the app effortlessly. Restart a preview at any time and take screenshots for desired screens. All the instructions appear clearly on your screen, which makes the job even easier.
Additionally, you can also test your Android and iOS app builds on real devices. Build your app and be thorough with its appearance and performance. In case you get stuck or need help with something, feel free to refer to the huge pool of help resources AppMySite has to offer.
Step 7: Generate app builds and submit the apps to the app stores
Once you are all ready to go live, proceed to create and ‘Download’ the Android and iOS app builds. These builds are basically the AAB or APK (for Android) and IPA (for iOS) files of your mobile app.
Generate and download the app builds and proceed to submit them to the respective app stores. In this section, you can also view the version and build history of your apps and keep track of everything.
Make use of the ‘Publish’ feature on AppMySite and streamline the process of app submission to make it easier and hassle-free. AppMySite is one of the very few platforms to offer such intuitive and automated app deployment support for pushing updates and new versions of the app.
It makes the app builder a great option for those who are not very well versed with the nitty gritty rules, guidelines, and processes of app submission on the Google Play Store and Apple App Store and want to perfect it in one go.
You also get the option of migrating your live app, if you already have one. Simply replace the live app with the app you built on AppMySite. Your app users can just update their app from the app stores to see the new version.
Bonus Step: Integrate advanced features to step up your game
If you think that doing the basics is not enough and want more for your app you are on the right track. You must tap into every possible opportunity to make the app more feature-rich and promote it to acquire leads.
Make use of the additional features of AppMySite and add more elements to your app. For instance, you can integrate ‘Notifications’, ‘Chat’, and ‘Monetization’ features in the app to send rich push notifications to your app users, integrate chat software and communicate with your users, and enable in-app purchases and ads in the app, respectively.
You can also leverage the ‘Merge’ feature to create an app for your WordPress Multisite network and merge multiple apps under one roof. Additionally, you can track app performance and key insights using ‘Analytics’, invite your colleagues and clients to work with you on the app projects with the ‘Team’ feature, and more.
Moreover, several options can be explored for enhancing the performance, security, and robustness of your app. In fact, there is much more to it, and you can explore all the features once you sign up for the app builder and start using it.
Enrich your app with these features and have a robust launch on the app stores. Thereafter, promote your apps and inspire more app installs using various marketing and branding techniques. It can all start with creating an account on AppMySite.
Suggested Read: Popular mobile app marketing techniques – The complete guide to success
What are the features that power the LearnDash app?
The app that you build on AppMySite for your LearnDash website is powered by several premium features. Some of them have been covered in the following points:
Student login and signup
AppMySite is integrated with the native ‘Users’ module within WordPress. This implies that any student who signs up on your website can log in with the same credentials on the app and vice versa. Extend multiple signup and login options to users and make onboarding easy.
Support for courses and lessons
With support for custom post types and taxonomies, AppMySite will be able to support any content you create with the LearnDash plugin. Offer any type of course module to your users and reach a large audience base. Upload unlimited content and make learning super easy.
Automatic website-app sync
All your website’s content – posts, pages, courses, and more will be synchronized automatically to the app. Any change you make to the content will also be reflected in the app instantly. Maintain consistency across multiple platforms and offer the same smooth experience to learners across channels.
In-app purchases and ads
Monetization is one of the biggest challenges for education-based apps. AppMySite makes it easy as it enables you to show in-app ads from the best ad networks and earn revenue. You can also enable in-app purchases and sell courses and digital products to your customers.
Push notifications
AppMySite enables you to send push notifications to all your app users. Schedule, customize, and send as many notifications as you like. You can also create and send rich push notifications that contain media, deep links, and other lucrative elements. Also, segment recipients and send targeted messages for higher impact.
Multilingual app
You can enable your users to select a language of their choice. Choosing a different language will translate the native buttons and labels of the app. However, notably, your website’s content will be displayed in the same language that it appears on the website.
One-click chat support
Offer 24×7 support to your learners. Extend the one-click chat feature in the app and enable users to connect with your staff and support team without any effort. Integrate any chat software of your choice and earn your learner’s trust and loyalty.
How to create a standalone mobile app for your online courses?
We have already gone through the process of creating an app for a LearnDash website. However, not every platform that offers courses will have a LearnDash site or a website built on WordPress for that matter.
However, this should not stop you from building your own app.
AppMySite provides support for all CMS platforms and web technologies and lets you turn any website into an app. Additionally, you can also create a standalone education app for your business from scratch.
The following steps explain how the process of creating a mobile app for your online courses works:
- Sign up for AppMySite and launch your account.
- On the welcome (Create App) screen, enter a name for your app.
- Next, select the type of app you aim to create. For instance, if you have a WordPress LearnDash website, you can turn it into a native WordPress app. For other web technologies, select ‘Website to App’ or select ‘Custom App’ to build an app without a website, and so on.
- Enter your website URL, if any, and continue to click on ‘Create App’ to launch your personalized dashboard.
- The following steps will remain more or less similar to the ones discussed above. Just follow the intuitive app builder and design your app.
- Preview and test your app on AppMySite’s live device emulators. If your website already has courses on it, you will be able to see them here.
- Download your app from AppMySite and submit it to the app stores.
Voila! That was it. Follow the steps discussed above and you will be able to create any type of education and learning app.
Suggested Read: School apps are the new normal! Here are 10 different ways of using them
How can a mobile app benefit educators and learners?
If you are still skeptical about investing in apps, let us shed some light on its benefits. Statistically speaking, revenue in the online education market is projected to reach the value of 185.20 billion US dollars in 2024. It is expected to grow at a CAGR (2024 to 2029) of 8.56 percent, amounting to a projected market value of 279.30 billion US dollars by 2029.
This shows that the interest in online teaching and learning is consistently increasing and will continue to rise in the coming years. Now, we also know that users are more inclined to smartphones as compared to desktops.
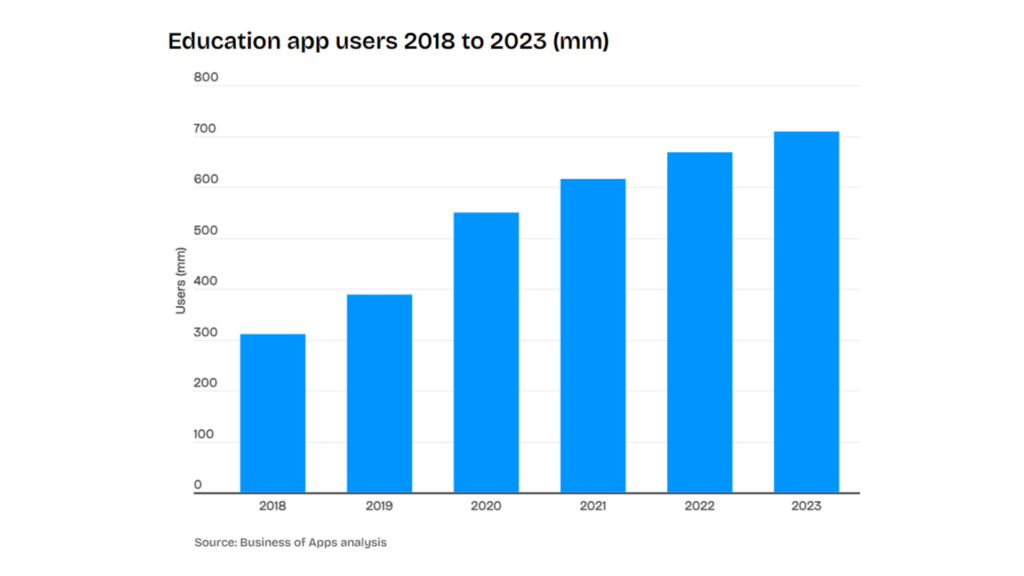
Moreover, reports exhibit that mobile users spend 90 percent of their time on mobile apps and just 10 percent of their time on mobile websites. As a matter of fact, Education apps were used by 709 million people around the globe and were downloaded 939 million times in the year 2023.
This goes on to underline the fact that if you want to tap into the growing demands of online education platforms, mobile apps are the way to go. While a website may be necessary for instant exposure on the web, apps can help you onboard long-term and loyal customers who are more committed to your learning platform.
As evident, apps can give more business and exposure to your education and learning brand. In turn, learners benefit due to ease of accessibility and availability. They can access courses with the click of a button and ensure better completion rates and success milestones.
Not to forget, apps can leverage your user’s native device features and customize the experience for them. Enhanced user experience can also lead to better engagement timelines leading to a rise in activity and learning potential.
Additionally, you can keep them engaged with push notifications, add an in-app chat feature to help them as and when needed, open new avenue channels with in-app purchases, and more. All-in-all apps can prove to be highly beneficial for both educators and learners and help them stay aligned with the trends and upgrades of the education industry.
Wrapping up!
Now that you have the guide handy, go ahead and build your own learning app. Launch it on the app stores and promote it to get more installs and conversions. Do not forget to discover our other blogs and learn about a wide range of topics without much hassle.
We have articles on WordPress website and app designing, development, maintenance, publishing, security, marketing, and a lot more. Go through the blogs of your choice and dive deep to get all the information you require.
Do not forget to sign up for AppMySite and explore the free app generator software if you wish to build an app for your education business. Launch your own Android and iOS applications and app your way to success in no time. Get, set, and grow!
Frequently asked questions
Discover answers to some commonly asked questions about developing a mobile app for your LearnDash website.
Is WordPress mandatory for LearnDash?
Yes, LearnDash is a WordPress LMS plugin. Therefore, you will need to install WordPress in order to ensure the functioning of LearnDash. As WordPress is one of the most powerful and largest CMS (Content Management Systems), it is a great platform for creating your learning and education website.
Does LearnDash work on mobile?
A LearnDash website optimized for mobile may work smoothly on your smartphone. However, if you convert your LearnDash website to app with AppMySite, you can publish it to the app stores and allow students and learners to easily access your courses. Moreover, if you have a LearnDash website and solely rely on your mobile site, you are missing out. Native apps can deliver a far superior user experience with powerful features and better loading times. Apps are also easily accessible at the touch of a button. Mobile websites, however, are only accessible via browsers. This makes them less accessible when compared to apps. So, launching an app will be the best way to go about it.
Does LearnDash require developer skills?
Not really. LearnDash is an easy-to-use plugin and should be effortless to work with. It comes with WordPress assurance which is one of the biggest CMS platforms. Similarly, AppMySite’s education app maker simplifies LearnDash app development and makes the process easier. Therefore, it should be easy for you to create your website and complement it with an equally powerful app.
Why Choose AppMySite for creating an app for a LearnDash website?
AppMySite is a true no-code DIY app builder that offers deep integration with WordPress and WooCommerce. If you have a LearnDash website, creating an app for it will be a breeze with AppMySite. From customizing the design to adding premium features and automatically populating the content, the end-to-end development process is as easy as it gets. Moreover, AppMySite is affordable and ensures faster development.
If I update course content in WordPress, is it reflected in the app?
AppMySite constantly synchronizes your website and app. This means any change to the content of your website is synced to the app as well. This will make it easier for you to manage your app, as all the content changes can just be made to the website itself.
Can I use my custom theme in the app?
The apps you build on AppMySite have their own native design and interface. You can customize the app’s design and color theme with the features available. Also, enable webview in your app if desired. This will simply render your mobile site within the app. Doing this will show your website’s custom theme in the app. However, this will not affect the native screens.
Is a LearnDash website necessary for education app development?
Not with AppMySite. Here, you can create an education app from scratch or turn any type of education website into an app. All the data from your website can be imported to the app and you will be able to set up your learning app in no time. AppMySite’s intuitive education app builder guides you through the process and makes app development super easy.